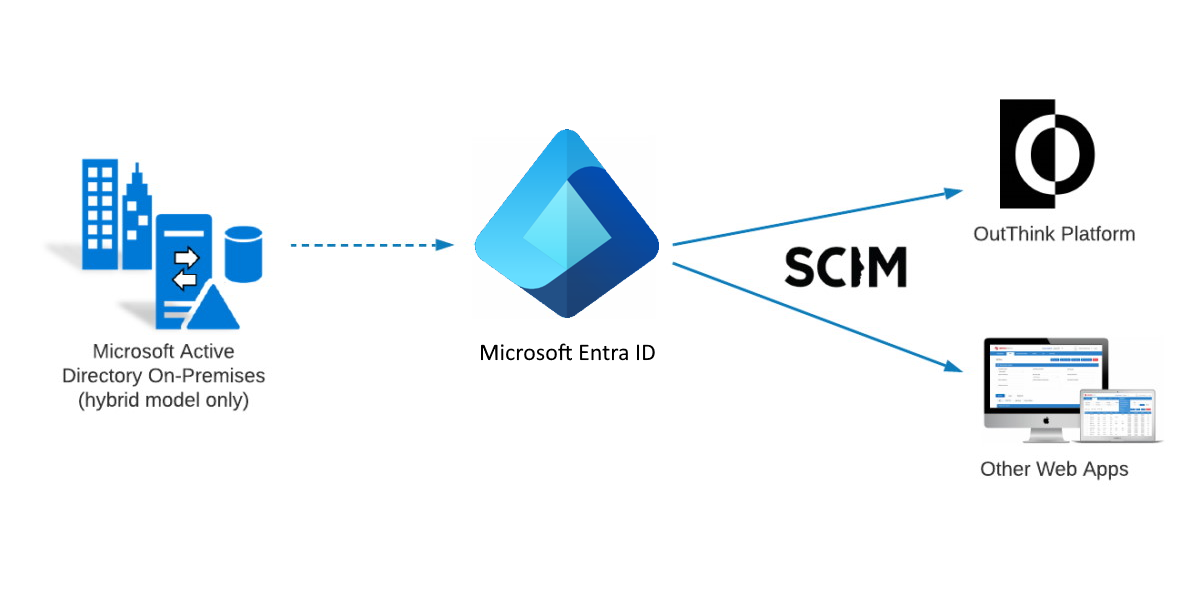
For customers using Microsoft Entra ID (Azure AD) as their Identity Provider, this section serves as a tutorial to setup the required synchronization with an Organization on the OutThink platform.
Creating a new enterprise application in Entra ID (Azure AD)
If necessary, the following procedure can be repeated any number of times to synchronize different user populations with different organizations or divisions, as modelled for your company in the OutThink system.
- Sign in to your Entra ID as an Administrator, go to Enterprise applications then select the + New Application option.
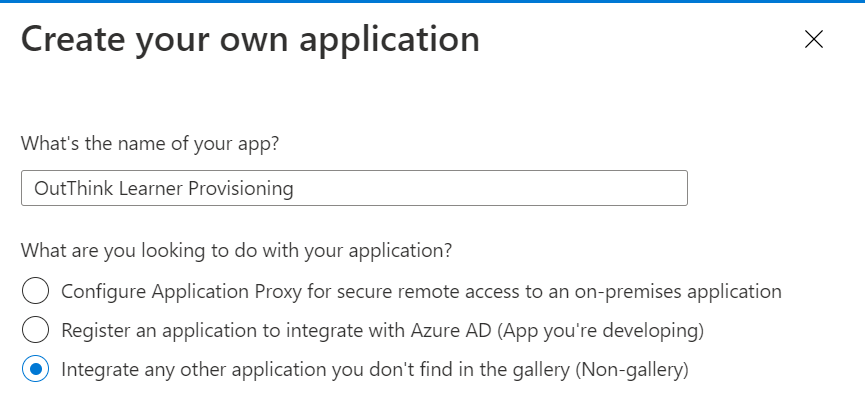
- From the top menu, select Create your own application.
- Use a name such as “OutThink End-User Provisioning” for the application, and select the option Integrate any other application you don’t find in the gallery. Click Create.
Assigning users to the application
- On the new enterprise app’s left panel, under Manage, click the Users and groups option.
- Use the Add User/Group option to assign the end-users that you wish to provision to the OutThink platform.
Please note you should only assign human user accounts to the application for synchronisation, i.e. ignore administrator, service and test accounts. You should also try to avoid assigning any human user that will not take part in any training or simulations. You may need to set up a new user group, possibly a dynamic group (link is for Microsoft documentation).
Provisioning your enterprise application
- On the new enterprise app’s left panel, under Manage, click the Provisioning option, followed by + New Configuration.
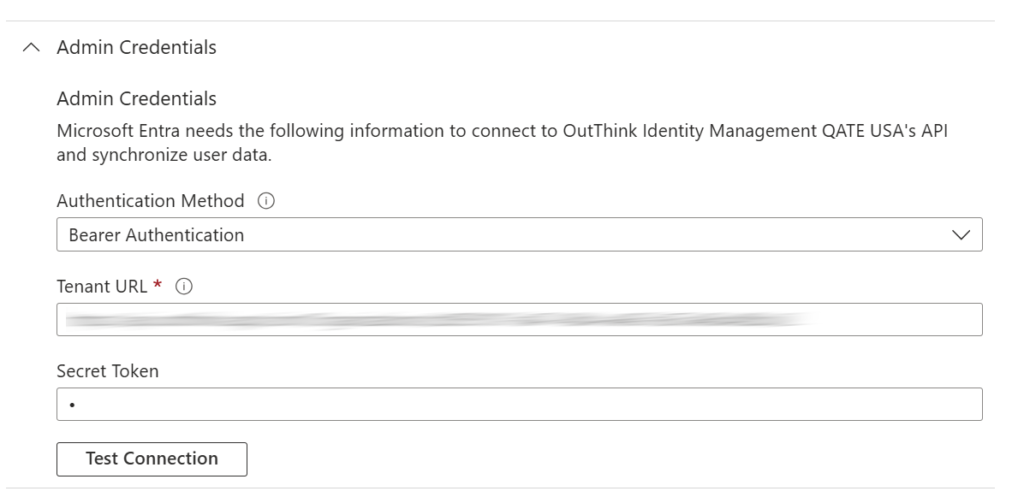
- Under the Admin credentials section of the New provisioning configuration screen:
- Set the Authentication Method to the Bearer Token option.
- Set the Tenant URL to your unique organization URL and the Secret Token to your uniquely generated token. These can be generated via the Command Center, as follows:
- Sign In to the OutThink Command Center.
- Navigate to Settings and toggle on the option called Automated User Provisioning (SCIM) in the User Provisioning section.
- The Token should be regenerated using the icon on the right, then copied.
- Hit Save Changes at the bottom of the page.
- Back in Azure, ensure that the Tenant URL and Token are pasted correctly.
- Click Test Connection, followed by Create.
Mapping Users
Under the Manage section heading, return to the Provisioning option. Expand Mappings ensure that the Provision Microsoft Entra ID Users is set Yes.
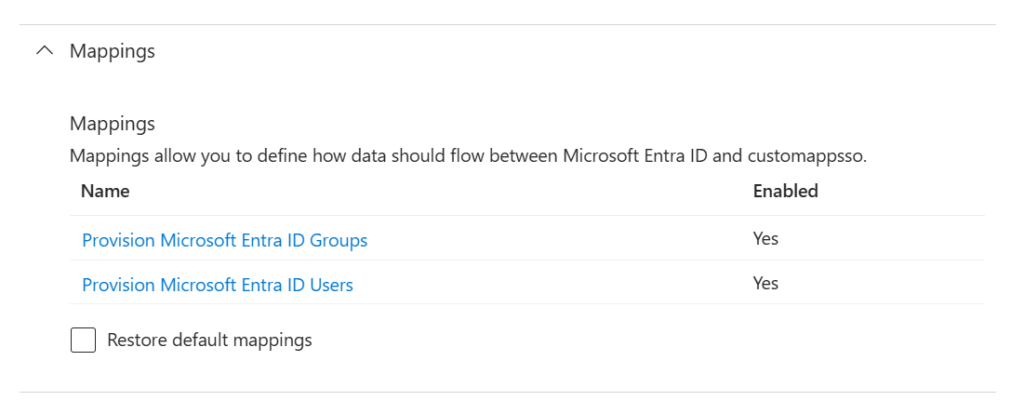
- Click on the hyperlinked text Provision Microsoft Entra ID Users.
- Adjust your user Attribute mappings so as to include only those attributes of your Entra ID users that you want to synchronize with OutThink. You must delete all unwanted attributes for successful provisioning to happen.
Click the Save button every time you perform an action within attribute mapping.
OutThink do not require any custom schema attributes to be created, and end-users can be provisioned using attributes defined within both the SCIM core and the SCIM Enterprise User Extension schemas.
| customappsso Attribute | Microsoft Entra ID Attribute | Mandatory? |
|---|---|---|
| userName | userPrincipalName | Yes |
| active | Not([IsSoftDeleted]) | Yes |
| emails[type eq “work”].value | Yes | |
| preferredLanguage | preferredLanguage | No |
| name.givenName | givenName | Yes |
| name.familyName | surname | Yes |
| addresses[type eq “work”].country | usageLocation | No* |
| externalId | objectId | Yes |
| roles[primary eq “True”].value | jobTitle | No* |
| urn:ietf:params:scim:schemas:extension:enterprise:2.0:User:department | department | No* |
| urn:ietf:params:scim:schemas:extension:enterprise:2.0:User:division | division | No |
| urn:ietf:params:scim:schemas:extension:enterprise:2.0:User:employeeNumber | employeeId (or mail) | No |
| nickName | mailNickname (or alternative) | No |
* Whilst not strictly mandatory, these fields are highly recommended. If not provided, available results will be limited.
In particular, note the following:
externalId – Unique global identifier of the user.
This is an unchanging permanent unique identifier for the user, and must be mapped to the Entra ID user’s objectId field.
addresses[type eq “work”].country – The User’s country, typically where they reside or perform their work.
If provided, this must be an ISO 3166-1 “Alpha 2” Code, such as “GB”, “US” or “FR”.
The Microsoft Entra ID field country is not conformant to this SCIM standard, therefore there are several recommended options here:
1. Map to the EntraID field usageLocation instead. This is SCIM compliant, but note that it can be automatically changed by EntraID, depending on where the user signs in to Microsoft products from.
2. Map to an expression, incorporating the country field. This should be a switch expression which maps countries to their conformant ISO codes. For an example of this expression, see the appendix.
urn:ietf:params:scim:schemas:extension:enterprise:2.0:User:employeeNumber – The user’s unique employee number within the organization. This is only used if OutThink is delivering training via your corporate LMS System. In this case, you can map any field which represents the internal unique identifier of users from your LMS. Examples may include employeeId or mail. If in doubt, contact your IT or Learning department.
nickName – The user’s unique name, badge Id, or other identifier, used for identification of the user. This field is optional, but will be required where shop floor or factory based workers require access to the OutThink Training Center (Training Portal), but do not have their own allocated email address. If provided, it should be unique across all users. This can be mapped to any appropriate field in Entra ID, such as mailNickname or otherwise.
preferredLanguage – The user’s native or preferred language.
If provided, this must be a combination of an ISO-639-1 Language Code and an ISO-3166-1 Alpha 2 Country Code. For example, “en-US”, “fr-FR” or “pt-BR”. This is typically mapped to the preferredLanguage field in Entra ID.
Line Managers
Due to Microsoft Entra ID non-conformance to the SCIM specification, ingestion of line managers should now be achieved via a GraphAPI integration. Any mapping of Entra ID manager fields to SCIM field can be removed.
Mapping Groups
If you also wish to synchronize groups from your Entra ID to the OutThink platform, set Provision Microsoft Entra ID Groups to Yes.

- Click on the hyperlinked text Provision Microsoft Entra ID Groups.
- Review your user Attribute mappings so as to include the necessary attributes of your Entra ID (Azure AD) Groups. These will typically be as follows:
| customappsso Attribute | Microsoft Entra ID Attribute | Mandatory? |
|---|---|---|
| displayName | displayName | Yes |
| externalId | objectId | No |
| members | members | No |
If you make any changes to the attribute mapping, ensure that you click the Save button.
Testing Provisioning
Once the attribute mapping is complete, you can test provisioning by using the Provision-on-demand option from the menu.
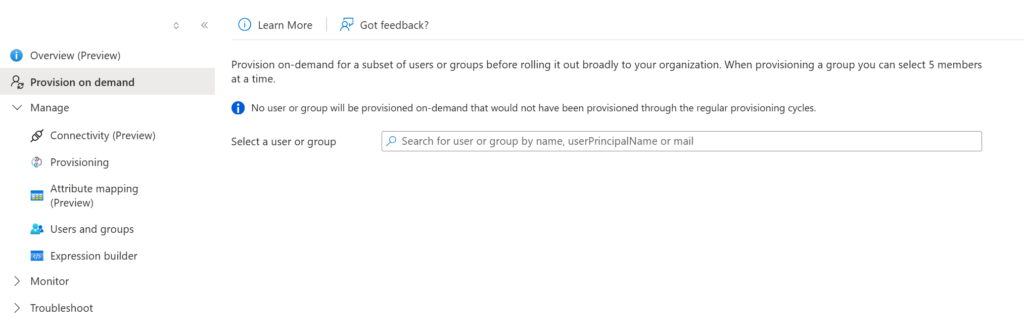
Enter the details of a user who has been assigned to the Enterprise Application, and test provisioning. Any errors or success messages will be immediately displayed. Launch the OutThink Command Center and review the User Dashboard to determine if the changes have been reflected. Important: It may take several minutes or more for a manually provisioned user to be reflected correctly in the Command Center.
Enabling Automatic Provisioning
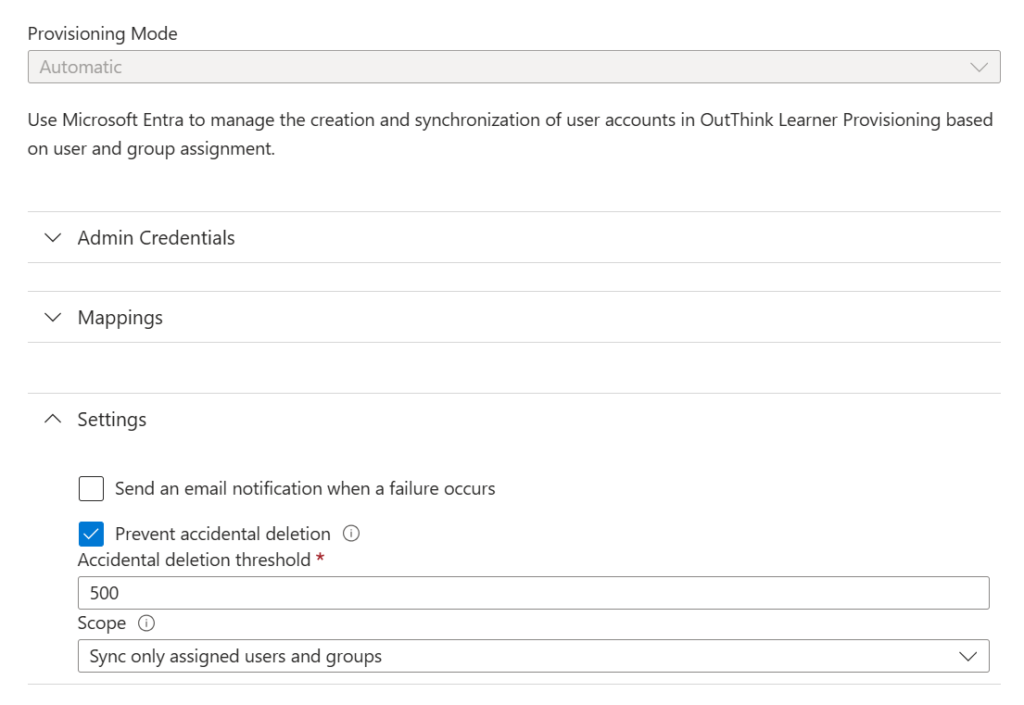
Once you have tested provisioning and are ready to automate the provisioning of end-users, you can switch on provisioning using the Provisioning Status option on the Provisioning page of the Enterprise Application, then click Save.
Under Settings, also ensure that the Scope of the integration is set to Sync only assigned users and groups.
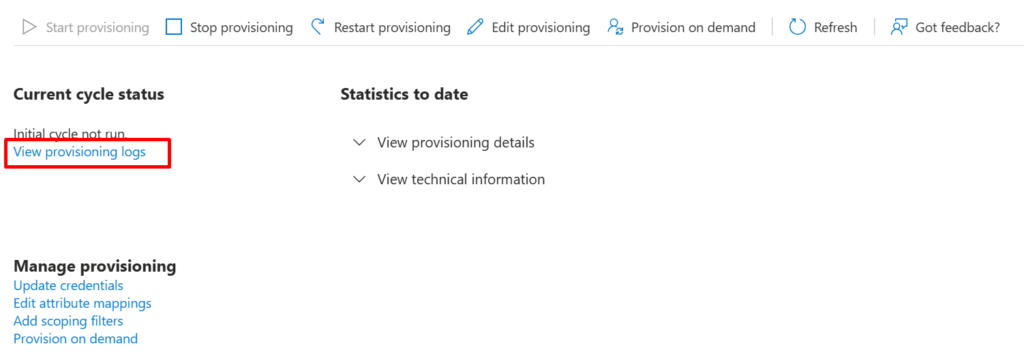
Provisioning will have been triggered, which may take several hours or more, depending on the number of users being provisioned. You can check the status of provisioning by returning to the Overview tab of the Enterprise Application at any time to view the provisioning status.
Click on the View provisioning logs option to consult which users have been synchronized, and any errors that may occur.
Appendix
For a sample expression that maps the user’s country field in Entra ID to a SCIM-compatible ISO country code, see the following:
IIF(IsNull([country]), "", Switch(ToLower([country], ), , "afghanistan", "AF", "albania", "AL", "algeria", "DZ", "american samoa", "AS", "andorra", "AD", "angola", "AO", "anguilla", "AI", "antarctica", "AQ", "antigua", "AG", "barbuda", "AG", "argentina", "AR", "armenia", "AM", "aruba", "AW", "australia", "AU", "austria", "AT", "azerbaijan", "AZ", "bahamas", "BS", "bahrain", "BH", "bangladesh", "BD", "barbados", "BB", "belarus", "BY", "belgium", "BE", "belize", "BZ", "benin", "BJ", "bermuda", "BM", "bhutan", "BT", "bolivia", "BO", "bosnia", "BA", "herzegovina", "BA", "botswana", "BW", "bouvet island", "BV", "brazil", "BR", "british indian ocean territory", "IO", "brunei darussalam", "BN", "bulgaria", "BG", "burkina faso", "BF", "burundi", "BI", "cambodia", "KH", "cameroon", "CM", "canada", "CA", "cape verde", "CV", "cayman islands", "KY", "central african republic", "CF", "chad", "TD", "chile", "CL", "china", "CN", "christmas island", "CX", "cocos islands", "CC", "colombia", "CO", "comoros", "KM", "congo", "CG", "democratic republic of the congo", "CD", "cook islands", "CK", "costa rica", "CR", "croatia", "HR", "cuba", "CU", "curaçao", "CW", "cyprus", "CY", "czech republic", "CZ", "denmark", "DK", "djibouti", "DJ", "dominica", "DM", "dominican republic", "DO", "ecuador", "EC", "egypt", "EG", "el salvador", "SV", "equatorial guinea", "GQ", "eritrea", "ER", "estonia", "EE", "ethiopia", "ET", "falkland islands", "FK", "faroe islands", "FO", "fiji", "FJ", "finland", "FI", "france", "FR", "french guiana", "GF", "french polynesia", "PF", "french southern territories", "TF", "gabon", "GA", "gambia", "GM", "georgia", "GE", "germany", "DE", "ghana", "GH", "gibraltar", "GI", "greece", "GR", "greenland", "GL", "grenada", "GD", "guadeloupe", "GP", "guam", "GU", "guatemala", "GT", "guernsey", "GG", "guinea", "GN", "guinea-bissau", "GW", "guyana", "GY", "haiti", "HT", "holy see", "VA", "honduras", "HN", "hong kong", "HK", "hungary", "HU", "iceland", "IS", "india", "IN", "indonesia", "ID", "iran", "IR", "iraq", "IQ", "ireland", "IE", "isle of man", "IM", "israel", "IL", "italy", "IT", "jamaica", "JM", "japan", "JP", "jersey", "JE", "jordan", "JO", "kazakhstan", "KZ", "kenya", "KE", "kiribati", "KI", "democratic people's republic of korea", "KP", "south korea", "KR", "korea", "KR", "kuwait", "KW", "kyrgyzstan", "KG", "lao", "LA", "latvia", "LV", "lebanon", "LB", "lesotho", "LS", "liberia", "LR", "libya", "LY", "liechtenstein", "LI", "lithuania", "LT", "luxembourg", "LU", "macao", "MO", "macedonia", "MK", "madagascar", "MG", "malawi", "MW", "malaysia", "MY", "maldives", "MV", "mali", "ML", "malta", "MT", "marshall islands", "MH", "martinique", "MQ", "mauritania", "MR", "mauritius", "MU", "mayotte", "YT", "mexico", "MX", "federated states of micronesia", "FM", "micronesia", "FM", "republic of moldova", "MD", "moldova", "MD", "monaco", "MC", "mongolia", "MN", "montenegro", "ME", "montserrat", "MS", "morocco", "MA", "mozambique", "MZ", "myanmar", "MM", "namibia", "NA", "nauru", "NR", "nepal", "NP", "netherlands", "NL", "new caledonia", "NC", "new zealand", "NZ", "nicaragua", "NI", "niger", "NE", "nigeria", "NG", "niue", "NU", "norfolk island", "NF", "northern mariana islands", "MP", "norway", "NO", "oman", "OM", "pakistan", "PK", "palau", "PW", "palestine", "PS", "state of palestine", "PS", "panama", "PA", "papua new guinea", "PG", "paraguay", "PY", "peru", "PE", "philippines", "PH", "pitcairn", "PN", "poland", "PL", "portugal", "PT", "puerto rico", "PR", "qatar", "QA", "réunion", "RE", "romania", "RO", "russian federation", "RU", "russia", "RU", "rwanda", "RW", "saint barthélemy", "BL", "saint helena, ascension and tristan da cunha", "SH", "saint helena", "SH", "saint kitts", "KN", "saint kitts and nevis", "KN", "saint lucia", "LC", "saint martin", "MF", "saint pierre and miquelon", "PM", "saint vincent and the grenadines", "VC", "samoa", "WS", "san marino", "SM", "sao tome", "ST", "sao tome and principe", "ST", "saudi arabia", "SA", "senegal", "SN", "serbia", "RS", "seychelles", "SC", "sierra leone", "SL", "singapore", "SG", "sint maarten", "SX", "slovakia", "SK", "slovenia", "SI", "solomon islands", "SB", "somalia", "SO", "south africa", "ZA", "south sudan", "SS", "spain", "ES", "sri lanka", "LK", "sudan", "SD", "suriname", "SR", "svalbard and jan mayen", "SJ", "swaziland", "SZ", "sweden", "SE", "switzerland", "CH", "syrian arab republic", "SY", "taiwan", "TW", "taiwan, republic of china", "TW", "tajikistan", "TJ", "united republic of tanzania", "TZ", "tanzania", "TZ", "thailand", "TH", "timor-leste", "TL", "togo", "TG", "tokelau", "TK", "tonga", "TO", "trinidad and tobago", "TT", "tunisia", "TN", "turkey", "TR", "turkmenistan", "TM", "turks and caicos islands", "TC", "tuvalu", "TV", "uganda", "UG", "ukraine", "UA", "united arab emirates", "AE", "united kingdom", "GB", "united states", "US", "united states minor outlying islands", "UM", "uruguay", "UY", "uzbekistan", "UZ", "vanuatu", "VU", "bolivarian republic of venezuela", "VE", "venezuela", "VE", "viet nam", "VN", "vietnam", "VN", "british virgin islands", "VG", "us virgin islands", "VI", "wallis and futuna", "WF", "western sahara", "EH", "yemen", "YE", "zambia", "ZM", "zimbabwe", "ZW"))
Was this helpful?
14 / 0