
For Microsoft Defender customers, OutThink recommends that whitelisting is first undertaken using the simple Defender Advanced Delivery Policy feature, as described here.
This section contains manual configuration steps for Microsoft 365 or On-Premise Exchange Server, which also includes advanced configuration for Defender customers, catering for more advanced whitelisting scenarios.

Whitelist OutThink Email Servers
The following IP Addresses must be whitelisted to bypass spam filtering within your organization. OutThink will send attack simulations from these servers.
147.253.222.115156.70.77.69168.203.49.20199.15.227.83
If your organisation employs an endpoint security device or other gateway which processes all incoming email, the origin IP Addresses of OutThink’s mail servers may not be detected. In this case, it is recommended to whitelist all sender email addresses used by OutThink’s Phishing Simulations instead, as detailed here.
For Microsoft 365 customers, whitelisting can be achieved as follows. Refer to the Microsoft documentation for further details, or to configure using Powershell instead.
- Login to the Security & Compliance Center at https://security.microsoft.com/.
- Navigate to Policies & rules -> Threat policies -> Anti-spam
(You can navigate directly here using https://security.microsoft.com/antispam). - Expand Connection filter policy by clicking
 , and then click Edit connection filter policy.
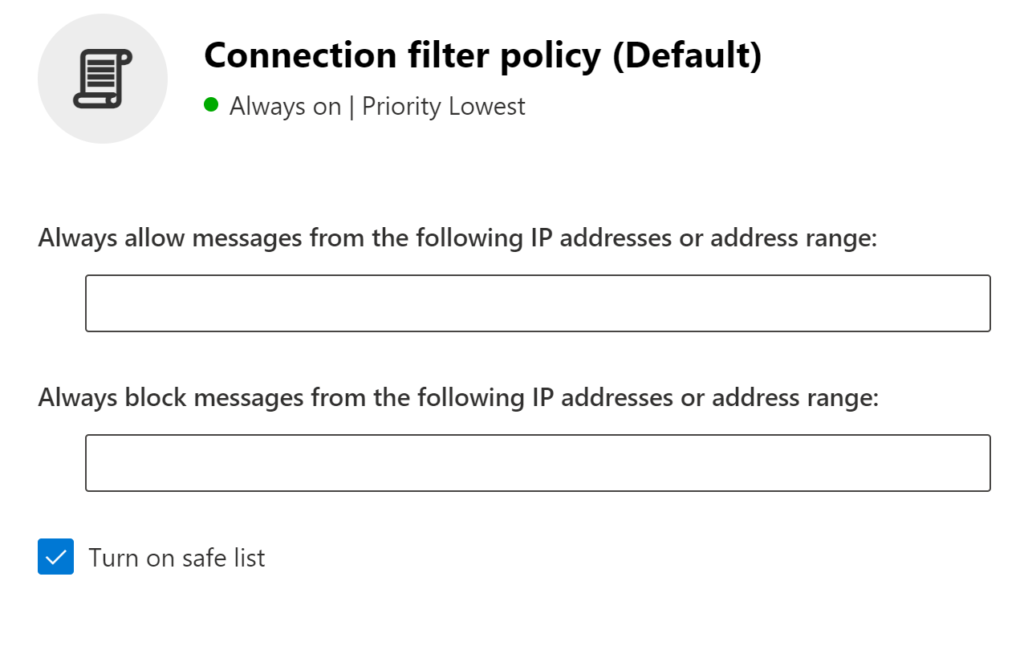
 - In the Default flyout that appears, configure the following settings:
- Always allow messages from the following IP addresses or address range:
Add all IPV4 addresses provided previously in this article. - Turn on safe list: Enable this option, if not already set.
- Always allow messages from the following IP addresses or address range:
- When finished, click Save.

Setup Safe Links Policies
The phishing simulation domains to be whitelisted can be obtained from the Settings > Simulation Domains section of the OutThink Command Centre. Alternatively, contact your Customer Success Representative.
Microsoft 365 automatically scans the URLs of links contained within e-mail, Microsoft Teams and Office 365 apps. Attack simulations may record this scanning as a “click” of the link, which results in erroneous data. Microsoft 365 can be told not to scan links from specific domains.
If you prefer using Exchange Online PowerShell for this process, you can refer to the Microsoft Documentation.
- Login to Microsoft 365 Defender at https://security.microsoft.com
- Navigate to Policies & rules (under heading Email & collaboration) -> Threat policies -> Safe Links
(You can navigate directly here using https://security.microsoft.com/safelinksv2). - If you do not have a Safe Links policy created, click Create
- Name your policy – we would recommend “OutThink Safe Links” for example. Click Next.
- Users and Domains – choose the users, groups and or full domain as required. Using a domain will include all users with an allocated email address. You can also exclude users, groups and domains from the new policy, by enabling the option on screen. Click Next.
- URL & click protection settings – we recommend that only Do not rewrite URLs, do checks via SafeLinks API only is left unticked. In the Email section, click on Manage x URLs (x will be a number)
- Manage URLs to not rewrite – this is a list of URLs that 365 Defender will not scan.
Add in OutThink’s phishing simulation domains, including the trailing path and asterisk (/*), using the Add URLs button. You can enter multiple domains before clicking Save.
Click Done to return to URL & click protection settings. Click Next. - Notification – you can choose either the default text, or custom text (including use of Microsoft Translator). Click Next.
- Review – this is to double-check the settings you have just entered. You can click Back to return to previous screens. Once finished, click Submit.
4. The created policy will display on the Safe links section. Click on the policy to show an overview in the right-hand pane. You can amend the users allocated to the policy using Edit users and domains, and the list of URLs added above using Edit protection settings then Manage 0 URLs.

Add Mail Flow Rules
The following is required to set the Spam Confidence Level and bypass Clutter evaluation rules when emails arrive from OutThink’s servers. This is a necessary step to ensure deliverability.
- Log in to the Microsoft Exchange Admin Center as an administrator, and navigate to Mail Flow -> Rules.
This can be accessed directly here: https://admin.exchange.microsoft.com/#/transportrules. - Select the + Add a Rule button and select Create a new rule from the drop-down.
- Enter the Name such as OutThink Spam Bypass Rule.
- From the Apply this rule if… dropdown, select The sender and then IP address is in any of these ranges or exactly matches.
- Enter the IP Addresses given above in Step 1, and click Add, then Save.
- Ensure that the Do the following… dropdown is set to Modify the message properties and the following dropdown is set to set the spam confidence level (SCL). In the flyout that appears, select Bypass spam filtering.
- Click the + sign to the right of the last rule you applied to create an additional rule.
- Under And, in the dropdown select Modify the message properties and in the subsequent dropdown, select set a message header.
- Click on the first Enter text link and set the header to
X-MS-Exchange-Organization-BypassClutter - Click on the next Enter text link and set the value to
true.
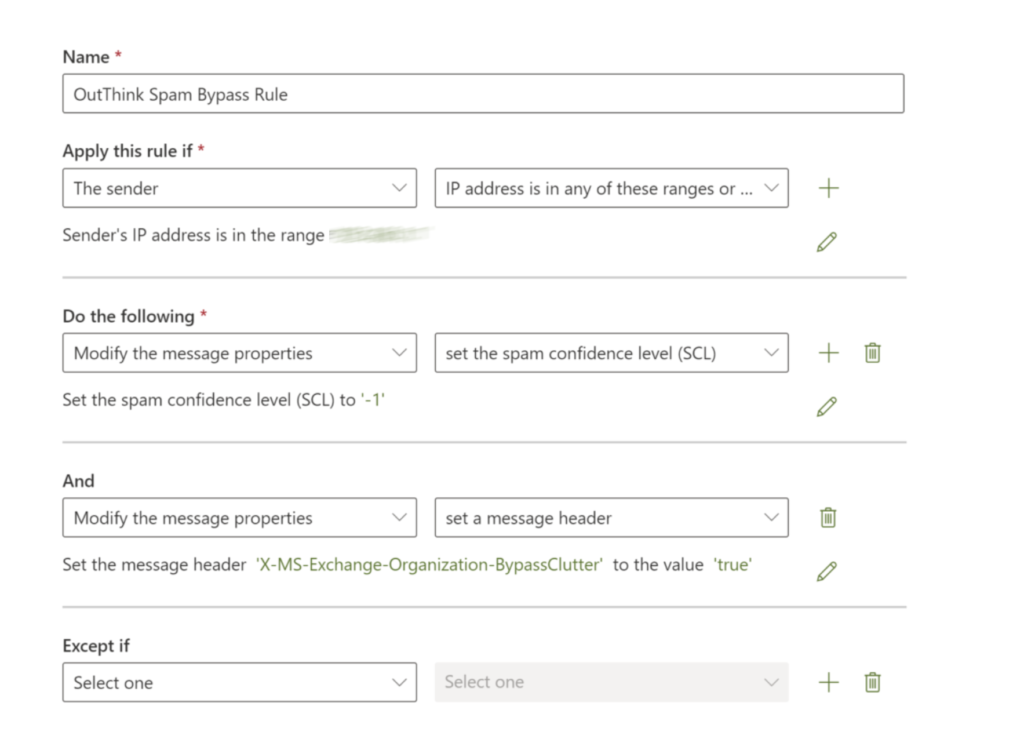
Click Next, and review the enforcement rules on the next page. Finally, click Next and Finish.

Add Focused Inbox Rule
Focused Inbox separates a user’s inbox into two tabs—Focused and Other. The most important email messages are on the Focused tab while the rest remain easily accessible—but out of the way—on the Other tab. It is important for OutThink training and attack simulations to be directed to the Focussed inbox, to ensure they receive appropriate attention.
- Log in to the Microsoft Exchange Admin Center as an administrator, and navigate to Mail Flow -> Rules.
This can be accessed directly here: https://admin.exchange.microsoft.com/#/transportrules. - Select the + Add a Rule button and select Create a new rule from the drop-down.
- In the window that appears, enter a Name, such as OutThink Focussed Inbox Rule.
- From the Apply this rule if drop-down, select The sender and IP address is in any of these ranges or exactly matches.
- Enter the IP Addresses as listed in Step 1, and exactly as entered in the previous step. Click Add followed by Save.
- Click Do the following and select Modify the message properties and set a message header.
- Click on the first Enter text link and set the header to
X-MS-Exchange-Organization-BypassFocusedInbox - Click on the next Enter text link and set the value to
true.
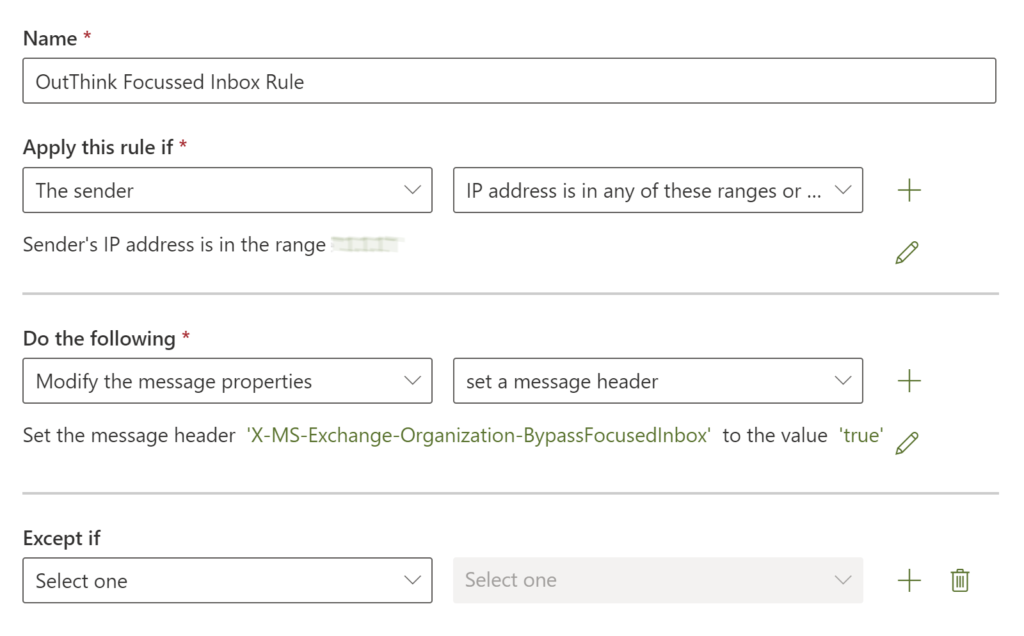
Click Next, and review the enforcement rules on the next page. Finally, click Next and Finish.

Defender for Office 365 (Advanced Threat Protection / ATP) Rules
If your organization is using Microsoft Defender for Office 365 (Advanced Threat Protection/ATP), you may need to setup additional mail flow rules. These rules will allow you to bypass safe links and attachment processing for advanced OutThink Attack Simulations sent to your end-users. This step includes a rule to bypass link processing, and a rule to bypass attachment processing.
To bypass safe link processing:
- Log in to the Microsoft Exchange Admin Center as an administrator, and navigate to Mail Flow -> Rules.
This can be accessed directly here: https://admin.exchange.microsoft.com/#/transportrules. - Select the + Add a Rule button and select Create a new rule from the drop-down.
- In the window that appears, enter a Name, such as OutThink Bypass for ATP Links.
- From the Apply this rule if drop-down, select The sender and IP address is in any of these ranges or exactly matches.
- Enter the IP Addresses as listed in Step 1, and exactly as entered in the previous steps. Click Add then Save..
- Click Do the following and select Modify the message properties and set a message header.
- Click on the first Enter text link and set the header to:
X-MS-Exchange-Organization-SkipSafeLinksProcessing - Click on the next Enter text link and set the value to
1.
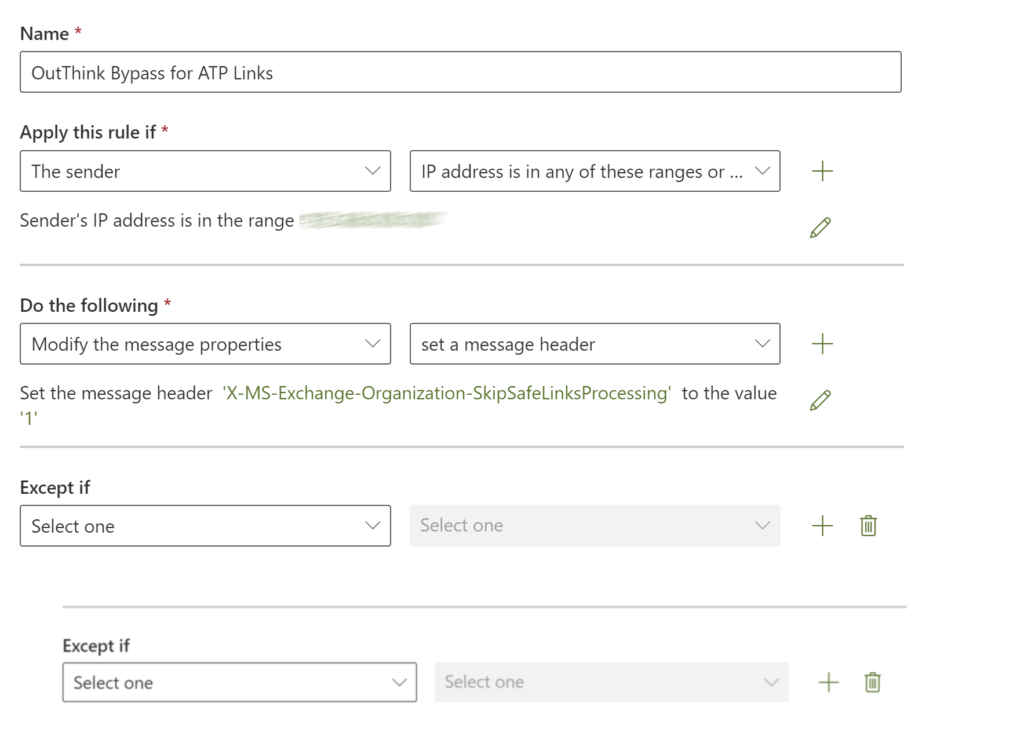
Click Next, and review the enforcement rules on the next page. Then, click Next and Finish.
Finally, the above will now be repeated to bypass attachment processing, as follows:
- Log in to the Microsoft Exchange Admin Center as an administrator, and navigate to Mail Flow -> Rules.
This can be accessed directly here: https://admin.exchange.microsoft.com/#/transportrules. - Select the + Add a Rule button and select Create a new rule from the drop-down.
- In the window that appears, enter a Name, such as OutThink Bypass for ATP Attachments and then select More Options… to display the advanced options.
- From the Apply this rule if drop-down, select The sender and IP address is in any of these ranges or exactly matches.
- Enter the IP Addresses as listed in Step 1, and exactly as entered in the previous steps. Click Add then Save.
- Click Do the following and select Modify the message properties and set a message header.
- Click on the first Enter text link and set the header to:
X-MS-Exchange-Organization-SkipSafeAttachmentProcessing - Click on the next Enter text link and set the value to
1.
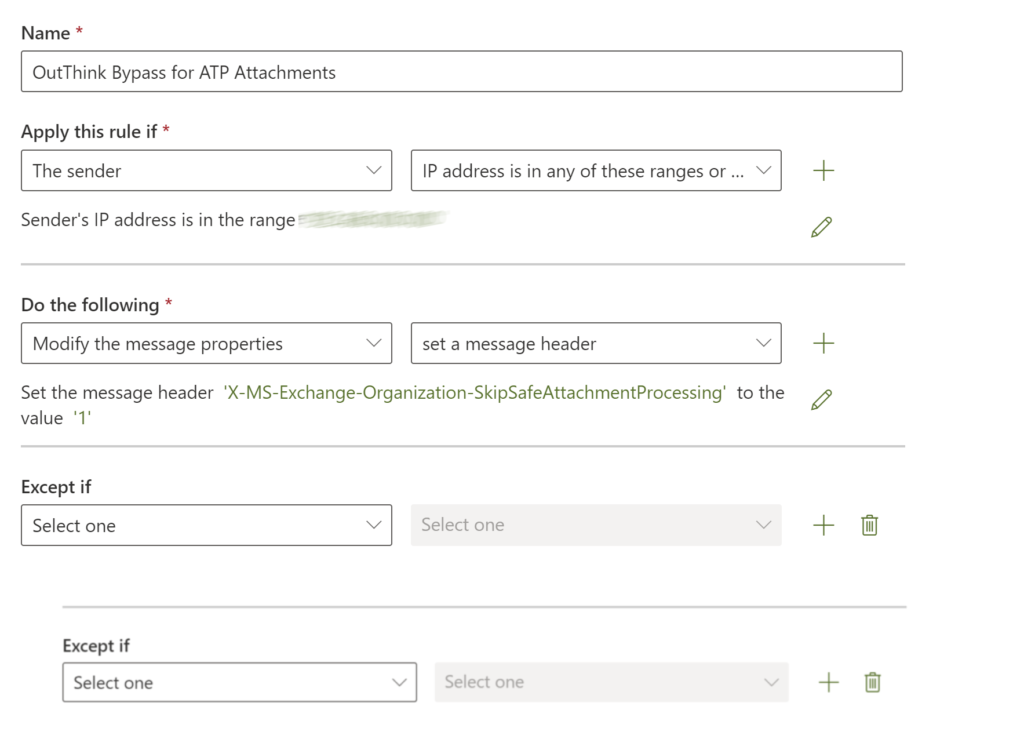
Click Next, and review the enforcement rules on the next page. Then, click Next and Finish.
Change Log
New IP Addresses – Updated October 2025
The following IP Addresses have been added for future compatibility. If you have not already included these IP Addresses in the whitelisting rules above, please do so.
156.70.77.69168.203.49.20
Banner photo by Markus Spiske
Was this helpful?
19 / 0