Overview
OutThink can deliver training notifications, email nudges and phishing simulation emails to your employees efficiently and reliably via our scalable email infrastructure.
This however typically requires a series of whitelisting steps to ensure that emails are not rejected as phishing or spam, not clicked by email filters, and correctly land in your user’s inboxes.
There are several reasons that OutThink recommends a new direct mail injection approach, which will create email directly into your employees’ inbox using Microsoft Graph API, without using any Email Infrastructure.
- Email whitelisting is notoriously difficult to accomplish, especially where complex and compounded email gateway infrastructure exists at your organization. This could result in emails not being consistently delivered, or phishing simulation links being falsely detonated, skewing campaign results.
- Customers want to have complete control over the originating sender of emails, such as to override the sender’s email address of a phishing simulation, or white-label training emails. This provides a very powerful means of presenting emails to your users that purport to come from your organization, relevant corporate bodies, or specific individuals. Such overriding of the address cannot be achieved via email infrastructure, due to the security requirements of DKIM and DMARC.
Unlike other vendors, OutThink’s solution complies with high security practices and security guidelines. We facilitate email delivery by introducing a novel proxy called the OutThink Direct Mail Injection App which is installed from the Microsoft Azure Marketplace, and is hosted within your own Microsoft Azure environment.
OutThink does not store or access any permissions from Microsoft Graph API directly to send, read or write email to your users.
Direct Mail Injection can be configured to work with phishing simulations, training notifications, training reminders, email nudges and line manager escalations.
Step 1. Installation
Important:
Installation is required for every Microsoft 365 tenant (Entra ID) where your users reside across your
organizational hierarchy. If all users reside in a single Microsoft 365 tenant, only a single installation is needed.
There are five steps to each installation, which will require access to your Microsoft Azure environment and to the OutThink Command Center.
- Create a DMI Key from the OutThink Command Center. This provides the credentials for the DMI App to get email data from the OutThink platform.
- Create an Azure App Registration in your Microsoft Azure Tenant which provides appropriate permissions to connect with your Microsoft Graph API to inject email to user inboxes.
- Create a Microsoft Azure Key Vault in your Microsoft Azure Tenant which protects a Client Id and Client Secret of the App Registration, and the OutThink API Key.
- Install the OutThink Direct Mail Injection App from the Microsoft Azure Marketplace, which regularly polls the OutThink API to determine if simulations or training messages need to be delivered.
- Grant rights for the OutThink Direct Mail Injection App to access the secrets stored in the Azure Key Vault.
For an architecture diagram of the solution, please refer to the Appendix at the bottom of this document.
1.1. Create a DMI Key from the OutThink Command Center
Navigate to the Settings menu of the Command Center, select the relevant Organization on the left hand side, then select the General Settings menu under the Organization header.
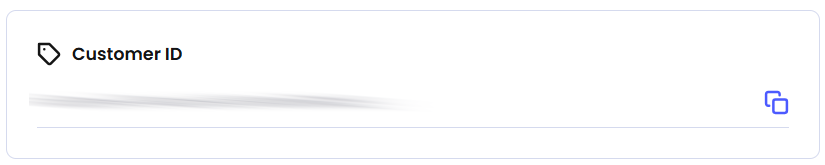
Firstly, make a note of the Customer ID near the top of this page. You will need this in the next step.
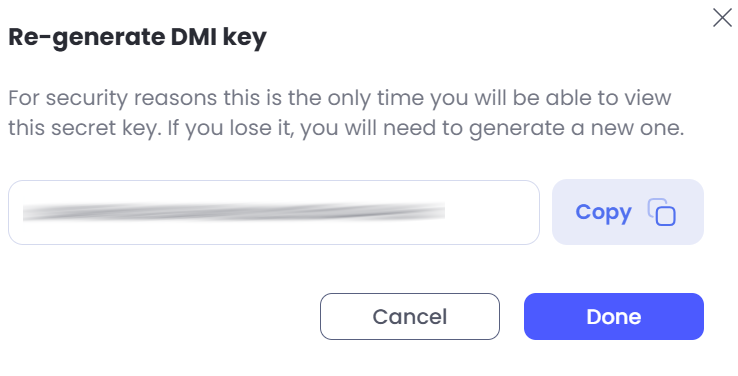
Now, scroll down the page to the Direct Mail Injection (DMI) section click Generate key.
Select the scope of the key – either for all Organizations (“Re-generate entire DMI key”), or for a single sub-organization. Once the selection is made, click Create a new DMI key.

Ensure that you Copy the key that has been generated, as you will not be able to retrieve this again. Finally, click Done.
1.2. Create an App Registration in Microsoft Azure
For the following steps, you will need to be granted permissions to be able to create resources in Microsoft Azure. If you do not have such permissions, contact your IT or Cloud Adminstrator.
1.2.1. Creating the App Registration
Sign In to the Microsoft Azure Portal and search for App Registrations.
Click + New Registration and provide a name such as OutThink Email Injection via Graph API.
Under Supported Account Types, ensure that
Accounts in this organizational directory only ([Your Organization] only – Single tenant) is selected.
Leave the Redirect URI blank and click Register.
Once registered, go to the Overview tab of the App Registration and securely note the Application (client) ID value. You will need this later.
1.2.2. Creating a Secret
From the new App Registration, navigate to Manage > Certificates & Secrets in the left hand menu and click + New client secret. Provide any Description and set the Expires option to an appropriate period of time, such as 12 months.
The Expires time period should be long enough to ensure it doesn’t continually expire, and short enough for best practice security. Long lasting secrets are not advisable.
Once the secret is created, securely note down the Value of the secret.
You will need this in the next section.
1.2.3. Granting Graph API Permissions
Next, we need to provide this App Registration with permission to inject emails. This is managed via the Manage > API permissions section from the left hand menu. From this section, click + Add a permission.
On the Request API permissions tab that appears, select Microsoft Graph.
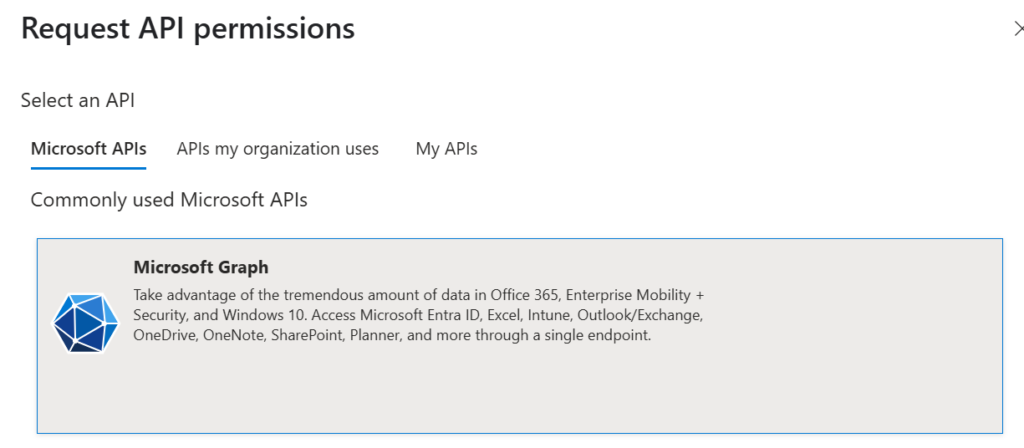
On the following page, select Application Permissions and type User.ReadBasic.All, check the box next to the permission and click Add Permissions at the bottom of the page.
Return to the + Add a permission option, and repeat the above steps to add the Mail.ReadWrite and Mail.Send Graph API permissions in the same way. Note that only one of these permissions will be used by the system, depending on the delivery options you select in the OutThink Command Center (discussed further in this article).
Three permissions, Mail.ReadWrite, Mail.Send and User.ReadBasic.All should now be showing under the Configured permissions section. To ensure that users aren’t asked to approve these manually, you must click the Grant admin consent option.

1.3. Create an Azure Key vault in Microsoft Azure
An Azure Key vault is needed to store access keys and secrets that will be used by the OutThink DMI App.
The following steps require an Azure subscription. If you do not already have one, you will need to contact your IT or Cloud Administrator to ensure one is created, or access to one is provided for this project.
The subscription must have the following Resource Providers registered:microsoft.alertsmanagementmicrosoft.insightsmicrosoft.operationalinsightsmicrosoft.web
1.3.1. Creating the Azure Key vault
This can be created by navigating to the Key vaults section in the Microsoft Azure Portal, and clicking on the button titled + Create.
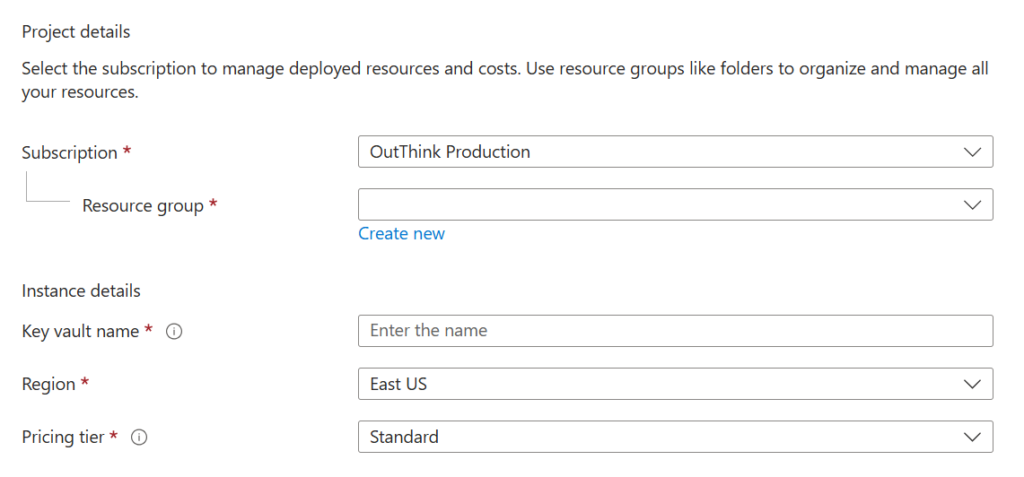
Select an appropriate Azure Subscription and Resource Group from the list. OutThink recommends that you create a brand new resource group to encompass all resources which are relevant to this installation.
Select any appropriate name for this new Key vault, such as outthink-keyvault.
Select an appropriate region and Pricing Tier.
Next, you may wish to restrict this Key vault to your network, using the settings on the Networking tab. This is optional, but is considered best practice. Discuss this with your IT or Cloud Administrator.
Once all settings are configured, click Review + create. Review all settings and finally click Create.
1.3.2. Creating Key vault secrets
To perform this section, you will need appropriate role-based access control (RBAC) to manage secrets in the Key Vault. This can be done under the Access Control (IAM) menu item on the left, and + Add role assignment. Contact your IT Administrator for assistance.
Navigate to the new Key Vault resource and select the Objects > Secrets option on the left hand menu. Using the + Generate/Import option, you will need to create five new secrets as follows:
| Name | Secret value |
| ClientId | The Application (client) ID noted down when creating the App Registration from the previous section. |
| ClientSecret | The Value of the Secret created in the App Registration from the previous section. |
| OtApiKey | The OutThink DMI key you noted down from section 1.1 |
| OTCustomerId | The OutThink Customer ID you noted down from section 1.1 |
| TenantId | Your Microsoft Entra Tenant ID For help finding this, see https://learn.microsoft.com/en-us/entra/fundamentals/how-to-find-tenant. |
1.3.3. Make a note of the Key vault URI
Navigate to the Overview page in the left hand menu, and copy the Vault URI on the left hand side. You will need this in the following section.
1.4. Install the OutThink DMI App from the Azure Marketplace
Navigate to the Azure Marketplace from within the Microsoft Azure Portal, and search the marketplace for OutThink. Click on the result for OutThink Direct Message Injection (DMI) and on the offer page, select the Standard Plan and click Create.
The OutThink Direct Message Injection (DMI) App from the marketplace is free of charge and will not incur any cost, however once installed it will incur a small App Service hosting charge in your Microsoft Azure subscription.
On the Basics configuration tab, select the same Subscription, Resource Group and Region that you selected when creating the Azure Key vault.
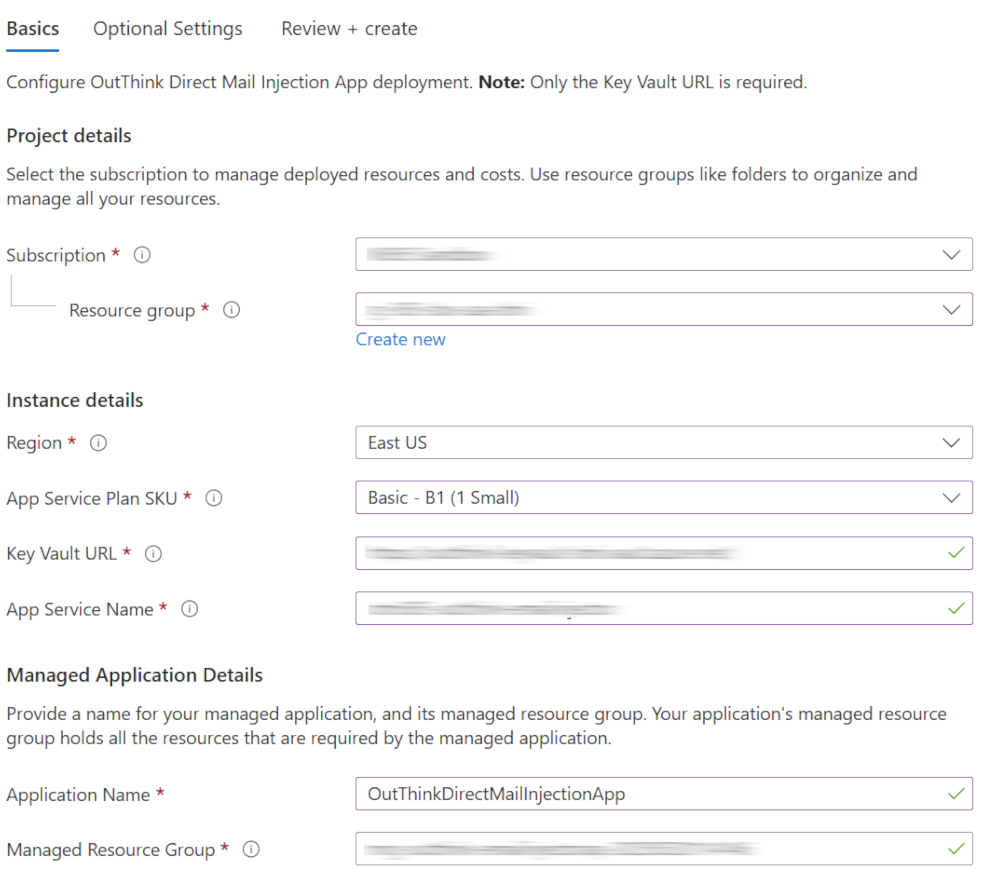
- Under App Service Plan SKU, select Basic – B1.
- For Key Vault URL, enter the Vault URI that you copied down from the previous section.
- For App Service Name, select any appropriate globally unique service name for the App Service that will be created.
- Choose an appropriate Application Name, such as
OutThinkDirectMailInjectionApp. - Leave the default provided for Managed Resource Group.
Next, navigate to the Optional Settings tab.
- Ensure that the API Base URL is set to https://api.outthink.io/dmi
Click Review + create, and finally Create.
The App will now be created, and may take a few minutes to complete. Wait for this to complete before continuing with the section below.
If an error is received during creation similar to “This region has quota of 0 Basic instances for your subscription“, you will need to either select a different region, a different SKU (not Basic), or alternatively raise a support ticket with Microsoft requesting a quota increase in your selected region.
If you receive an error with text similar to “Website with given name outthink-emailinjector already exists“, it means that you have not changed the default value for the App Service Name. Ensure that you select a globally unique name.
1.5. Grant Key Vault permissions to the OutThink DMI App Service
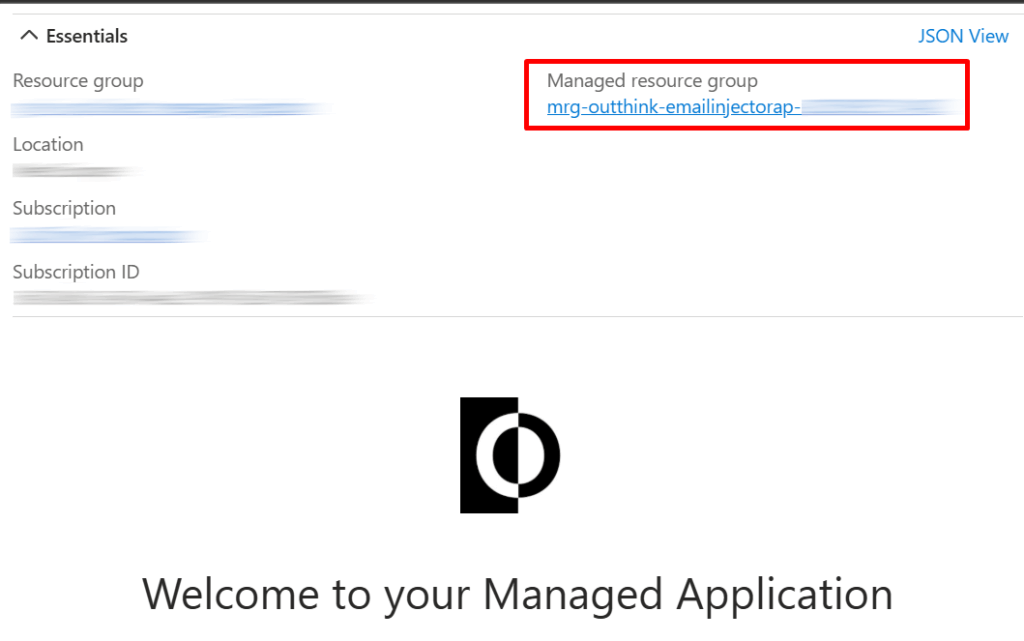
The final step of the installation is to ensure that the App Service which was deployed with the DMI Marketplace App has access to read the secrets from the Key vault.
From the OutThink DMI App that you just installed, click on the hyperlink of the Managed resource group.
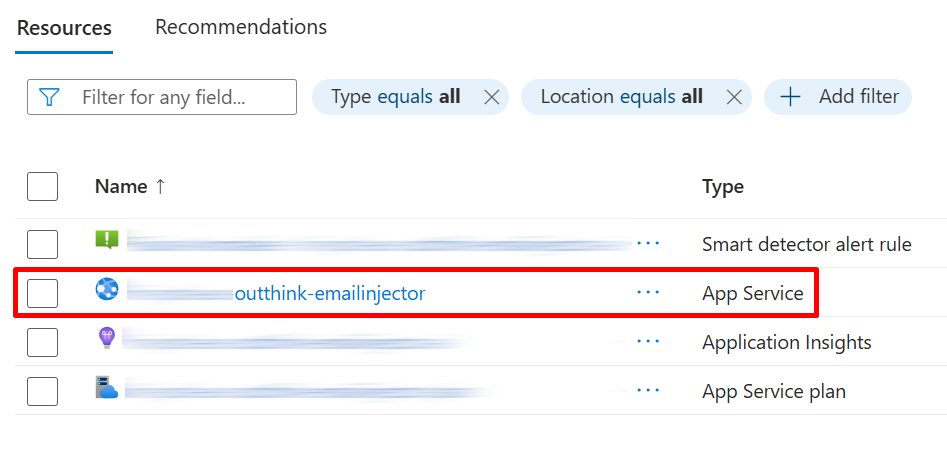
From the resource list in the Resource Group, find the App Service and click on its hyperlink.
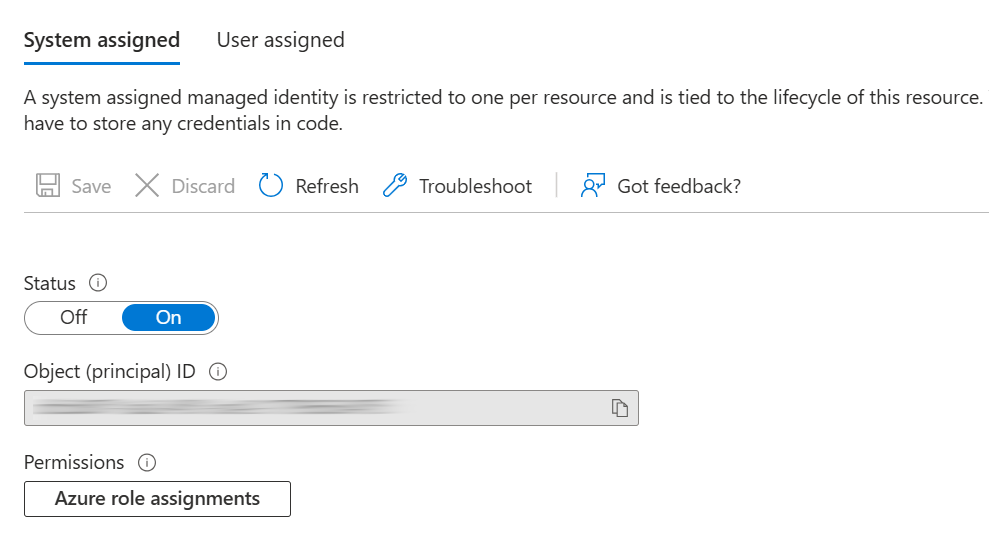
Now go to the Settings > Identity menu item, and under the System Assigned tab, switch the Status to On and then Save. This may take a few minutes.
Finally, navigate back to the Key vault that you created in the previous step, and navigate to Access Policies from the left menu. Hit the Create button to add a new policy.
Under Secret Permissions, ensure that Get and List are checked, before clicking Next at the bottom of the page.
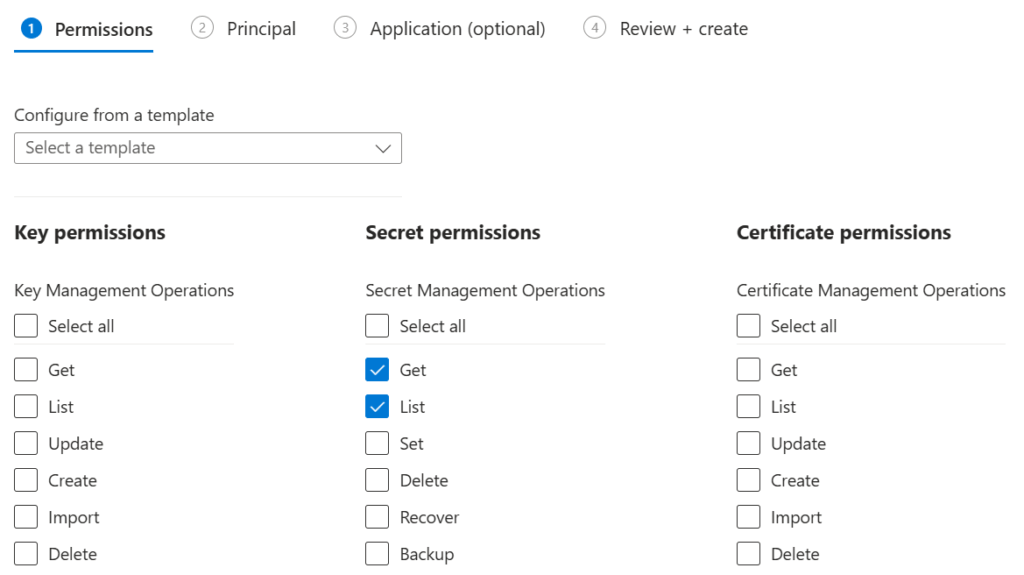
On the Principal step of the wizard, find the Managed Identity that you just created and select it. It will have the same name as the DMI App that you installed in the previous step.
Click Next, Next again. Review the access policy, then finally Create.
Step 2. Configuration
Enable DMI for Phishing and/or Training emails
From the OutThink Command Center, navigate to the Settings section. Select the relevant Organization on the left hand side.
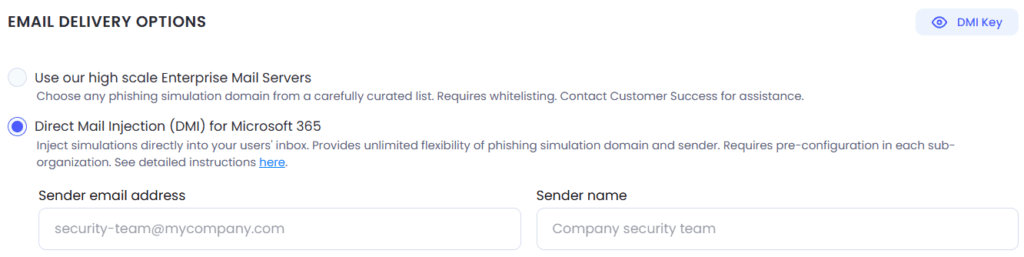
To enable DMI for Phishing Simulations:
On the right hand side navigation menu, select General Settings under the Phishing header.
On the right hand panel, select the Direct Mail Injection (DMI) for Microsoft 365 option. Choose an appropriate default Sender email address and Sender name representing the entity or person you wish your simulations to appear to come from. These can be changed at any time.
Hit Save Changes.
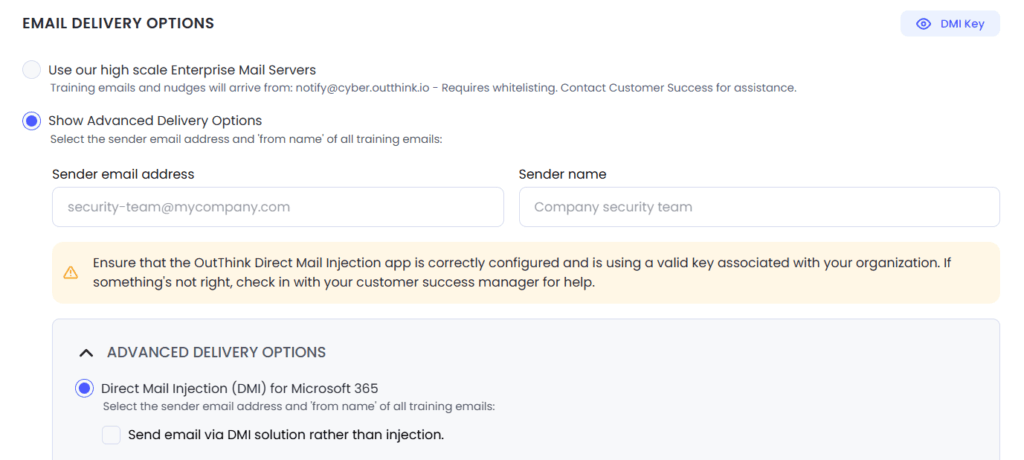
To enable DMI for Training Notifications, Reminders, Nudges and Escalations:
On the right hand side navigation menu, select General Settings under the Training header.
Under the Email Delivery Options section, select the Show Advanced Delivery Options radio button and choose an appropriate Sender email address and Sender name that you would like to apply to all outgoing training emails.
Next, expand the Advanced Delivery Options panel ensure the Direct Mail Injection (DMI) for Microsoft 365 option is selected, and hit Save Changes.
Step 3. Whitelisting
The OutThink DMI solution can completely remove the requirement for inbound whitelisting, meaning that training notifications and/or phishing simulation emails should always be delivered to user inboxes, regardless of any email security solution employed.
When used for Phishing Simulation delivery however, there is still be a requirement to ensure that when a user clicks the phishing simulation hyperlink in an email, that the simulation landing page is not blocked from launching in a browser. This is typically a simple whitelisting action. For example, for Microsoft Defender customers, the Safelinks Policy should be configured as detailed in section 5 here.
For other systems, contact your Customer Success representative.
Step 4. Testing
Once Installation and configuration are complete, it’s time to test email injection.
Create any Training or Phishing Simulation campaign (as appropriate) using the Command Center, and add yourself to the campaign. Ensure the campaign is marked as a Test. After a few minutes, check that you have received the email in Outlook, and that you can interact with it successfully.
For a Phishing Simulation Campaign, click the hyperlink and ensure that the Clicked status is correctly reported for your user on the Phishing Campaign Dashboard in the Command Center.
For a Training Campaign, ensure that you can launch the training successfully and the In Progress status is flagged for your user on the Training Campaign Dashboard in the Command Center.
For more details on how to create campaigns and analyze the results, see https://help.outthink.io/category/create-campaign/
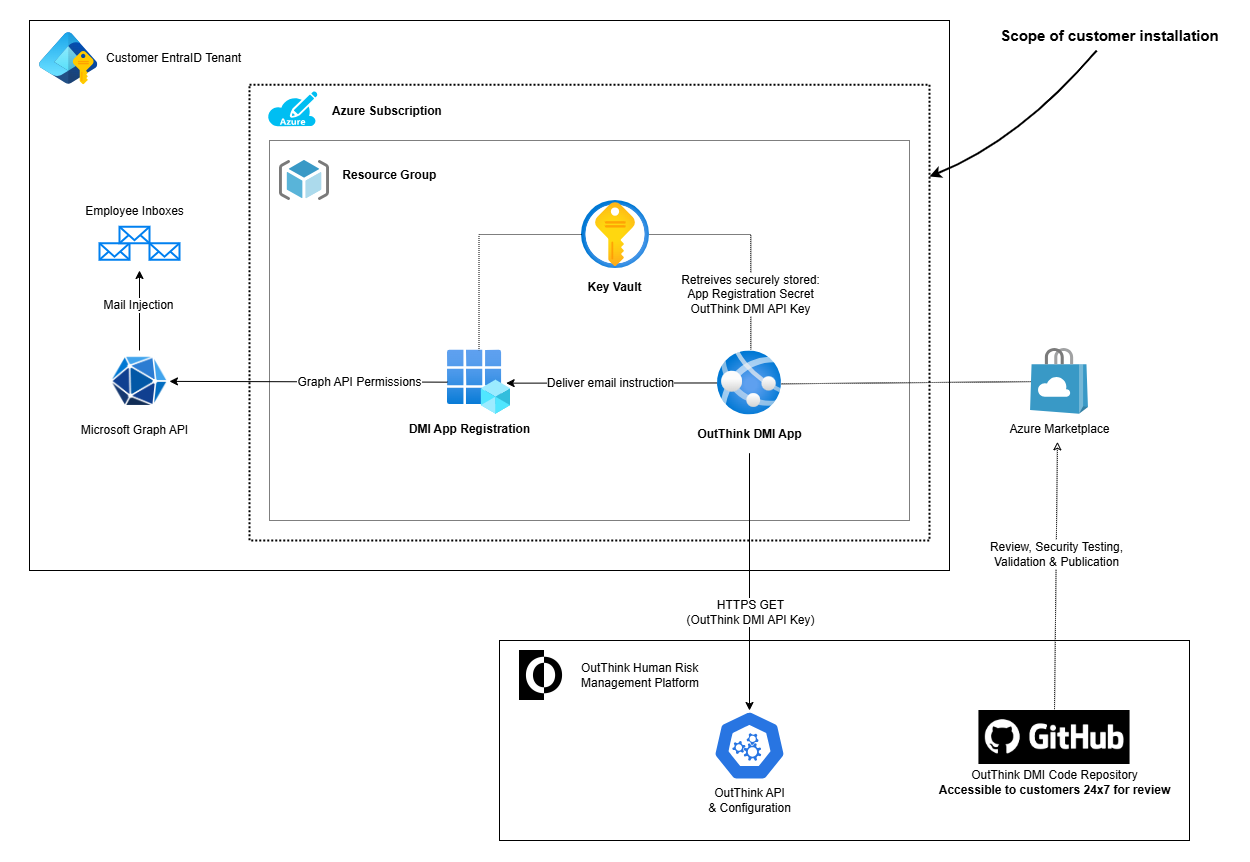
Appendix: Architecture
The following presents a full overview of the architecture of OutThink’s DMI solution.
For code review access to OutThink’s DMI Code Repository, vulnerability scan or penetration testing results, contact your Customer Success Manager.
Was this helpful?
11 / 0