
This feature is being superseeded by OutThink’s new Direct Mail Injection capabilities, which requires no elevated permissions to be granted. This will be available from April 2025. Please contact your Customer Support Manager for further details.
Overview
OutThink can deliver both training and phishing simulation emails to your employees efficiently and reliably via our scalable email infrastructure. This typically requires a series of whitelisting steps to ensure that emails are not rejected as phishing or spam, and correctly land in your user’s inboxes.
There are two reasons however where you may prefer a direct mail delivery approach, which will insert email directly into your employees inbox using Microsoft Graph API:
- Where email whitelisting cannot be comprehensively carried out due to complex or unknown email gateway infrastructure at your organization. This could result in emails not being consistently delivered, or phishing simulation links being falsely detonated, skewing campaign results.
- Where you want more bespoke control over the originating sender of phishing simulations, such as to override the sender’s email address. This provides a very powerful means of presenting emails to your users that purport to come from absolutely anyone.
To enable Direct Mail Delivery for Microsoft 365 in your Organization, follow the steps in this article.
You will need to have the following permissions in your Microsoft Azure Tenant before proceeding:
- Application Developer
Required to create an application registration in the Microsoft Azure Portal. - Global Administrator, Privileged Role Administrator or a custom directory role that includes the permission to Grant Admin Consent to the application.
You will also need to be an OutThink administrator, with access to your tenancy via the Command Centre at https://cc.outthink.io.
Create New Registration
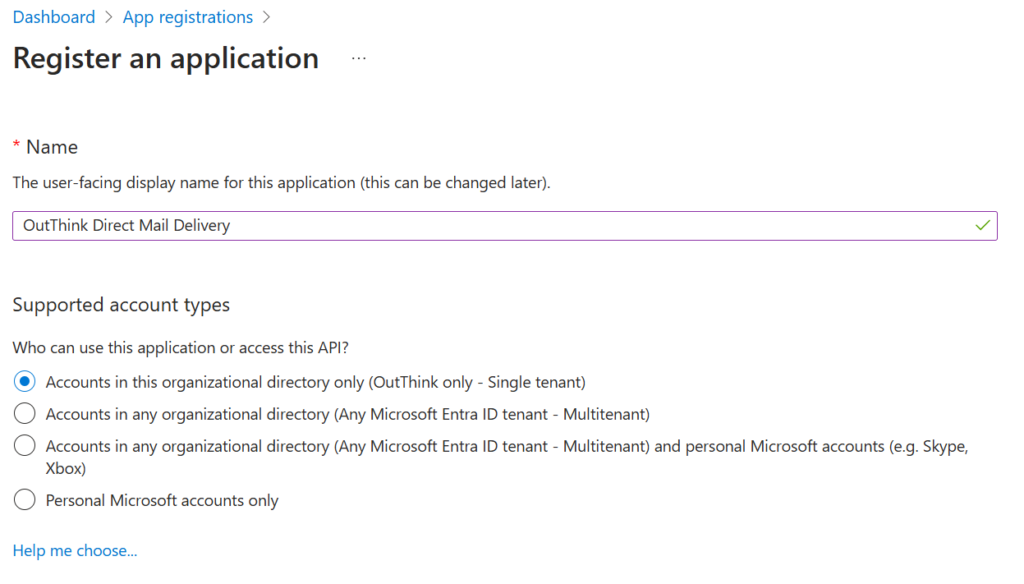
- Login to the Microsoft Azure Portal, and search for App Registrations.
- Click + New Registration and enter an appropriate name for this application.
Set the Supported Account Type to Accounts in this organizational directory only.
Click Register.
- Under the Manage option on the side menu, select Certificates & secrets, and click the + New client secret button.
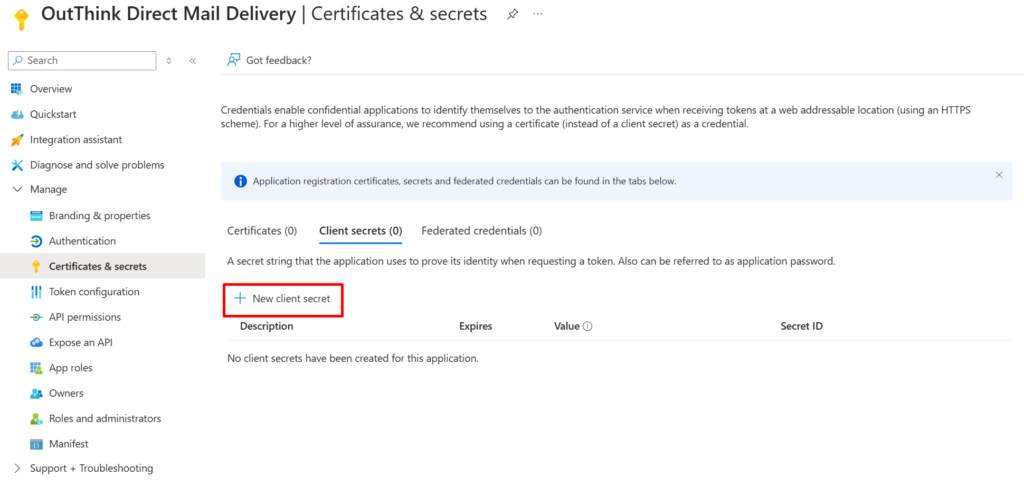
- Add a relevant Description for the secret, and choose an appropriate Expiry period.
As this permission is only required during campaign launch, consider restricting the validity of the secret to align with when you wish to launch a campaign. We recommend an expiry of no longer than 3 Months. - Copy the secret Value to a secure location. You will need this later.
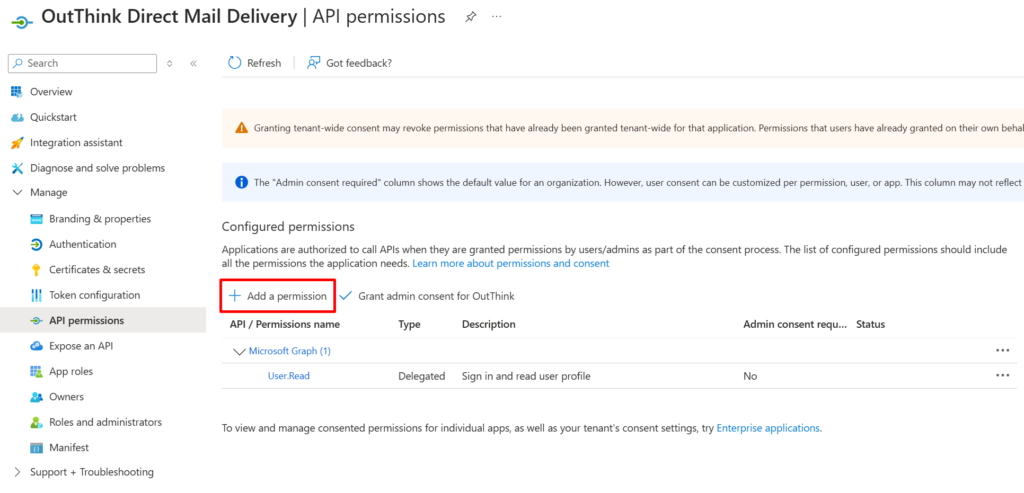
- The next step is to define the Graph API permissions that this application will be configured to use in order to deliver email. Select API permissions on the left menu, then click + Add a permission.
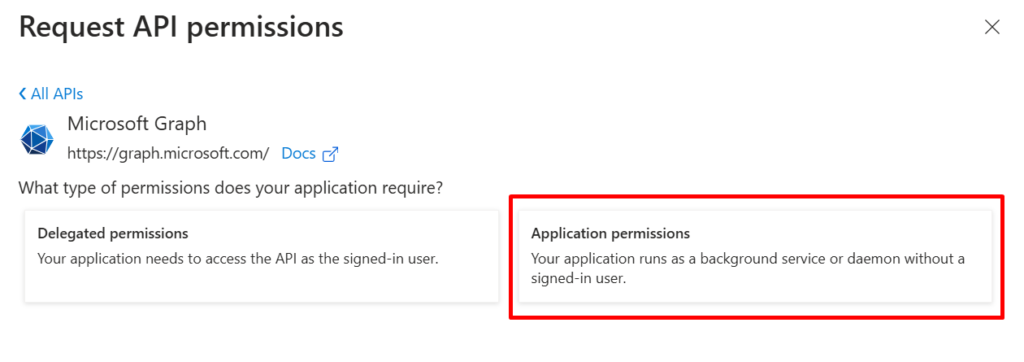
- On the fly-out that appears, select Microsoft Graph under the Microsoft APIs tab, then select Application permissions.
- Under Select Permissions search for the ReadWrite permission under Mail, and check it.
When finished, hit the Add permissions button.

Grant Admin Consent
- As a final step in the application setup, you will need to Grant admin consent for your application. Click the “Grant admin consent for {organization}” button, as shown below, and confirm.
If you do not have privileges to grant tenant-wide admin consent for this application, you can instead construct a URL and send to your tenant administrator, as detailed here.

Security Safeguards
The Direct Mail Delivery feature will never read any email messages, delete emails or otherwise interact with the user’s mailbox other than to insert simulations as part of an official phishing simulation campaign run and managed by you.
OutThink however have introduced additional safeguards and recommendations to protect the security of your data when using the Direct Mail Delivery feature.
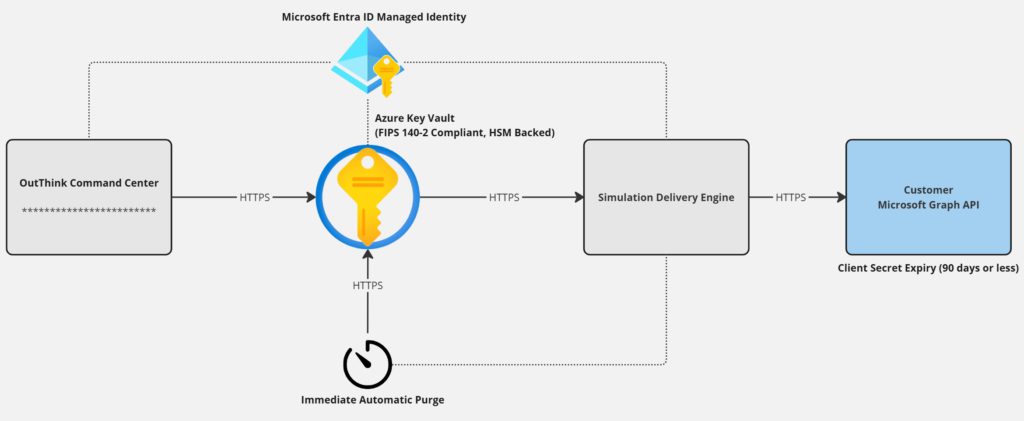
When providing the client secret via the OutThink Command Center, it is immediately stored encrypted in a FIPS 140-2 Compliant Hardware-Security Module (HSM) backed Azure Key Vault. This secret is accessed securely only during campaign launch using an Entra ID Managed Identity.
Recommendation: Enforced Secret Expiry
The client secret associated with the App Registration that you have created in Entra ID can be set to expire after a given time period, or on a given date. For good security practice, OutThink recommends that you set the expiry to no more than 90 days (3 months). Once this secret expires, you will need to create another and re-provide this via the OutThink Command Center settings.
Optional: Automated Secret Purge
For additional piece of mind, OutThink offers an optional feature when storing the secret called “Automatically purge client secret at the next phishing simulation campaign“.

If checked, storage of this secret will be automatically and irrevocably destroyed the moment it is no longer required. This means that the secret is only required for a short window immediately before, and upon completion of the email distribution step when launching any phishing simulation campaign.
Note: If this option is turned on, the secret can be refreshed immediately prior to each campaign launch. You will be reminded if a campaign is attempted to be launched when the client secret has been previously purged, or has expired.
Was this helpful?
1 / 0